

Step-by-Step Tutorial: Creating Stunning Nail Designs with Cre8tion Extension Gel
Alternative: Tutorial for Creating Gel Nail Extension Design with Crea8tion
Cre8tion Extension Gel is a gel formulated specially to extend and strengthen natural nails, providing exceptional durability and flexibility. Its user-friendly application and endless options for experimentation make it a loved product for nail art enthusiasts around the world.
Benefits of Cre8tion Extension Gel:
- Durability: Cre8tion Extension Gel resists chipping and cracking, ensuring long-lasting nail extensions.
- Flexibility: Its natural flexibility enhances comfort and reduces the risk of breakage.
- Easy Application: Smooth and effortless to apply, suitable for both professionals and beginners.
Stunning Gel Nail Extension Design with Cre8tion Extension Gel
To create some gorgeous gel nail extension designs using Cre8tion extension gel we have created a step-by-step tutorial for four different and beautiful handpicked gel nail extension designs. Let’s get started.
List of Materials Required for All Four Gel Nail Extension Designs:
- Cre8tion Clear Extension Gel
- Nail tips or forms
- LED or UV lamp
- Nail file
- Nail cleanser
- Nail brushes
- Cre8tion Scratch-resistant Topcoat
- Nail art tools like dotting tool
Tutorial of Gel Nail Extension Designs with Cre8tion Extension Gel
Here are some of the common steps to follow in each of the designs demonstrated below-
Step 1: Prep the nails by cleaning them
Step 2: Apply the base coat
Step 3: Apply nail form
Continue to step 4 for the respective design of your choice curated below-
Design 1: Bold Encapsulated Long Coffin Nails
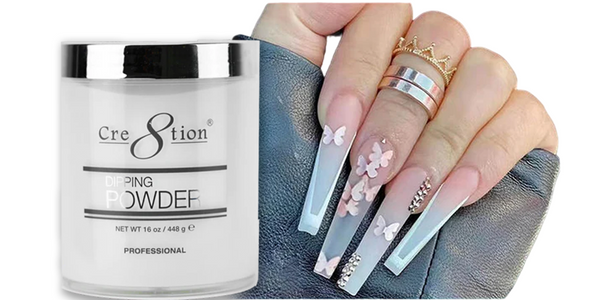
Step 4: Apply extension gel in a coffin shape
Step 5: Cure the extension gel
Step 6: Starting from the tip of the long coffin nails, apply clear acrylic dipping powder in small amounts and work upwards toward the cuticle
Step 7: Curing the acrylic powder under UV light
Step 8: Shape the nails using a nail filer
Step 9: Add dried flowers/butterflies to create the butterfly nail design
Step 10: Cure the nail again
Step 11: Apply clear acrylic dipping powder followed by the topcoat to add depth in the design
Step 12: Cure the gel one more time
Step 13: Lastly apply the thicker viscosity gel using a dotting tool to stick gems
And there you go with the beautiful encapsulated long coffin nails in butterfly nail design!
Design 2: Morning Dew Glitter Gel Nail Extension Design

Step 4: Apply the extension gel in the shape of a medium stiletto shape
Step 5: Cure the Gel
Step 6: Apply the Glitter Gel
Step 7: Cure the glitter gel under a UV lamp
Step 8: For finishing touches apple top coat and you’re ready to go with your morning dew glitter stiletto nail design!
Design 3: Love for Nude Hues
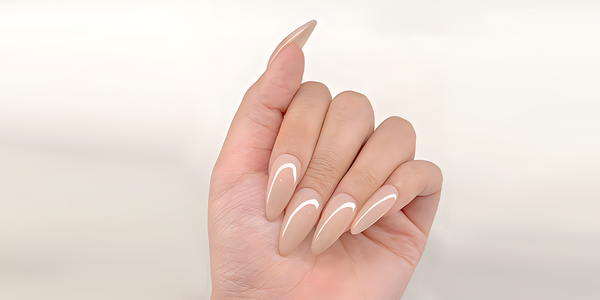
Step 4: Apply the extension gel in the shape of a medium stiletto shape
Step 5: Cure the extension gel
Step 6: Apply builder gel
Step 7: Cure the builder gel
Step 8: Repeat steps 5 and 6 in the same order once again
Step 9: Apply topcoat to finish the glossy beautiful nude hue on your stiletto nail design
Design 4: Silver Foil Design
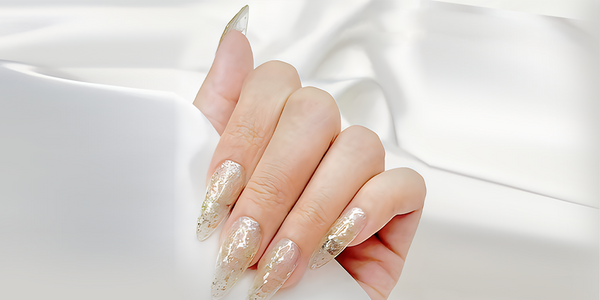
Step 4: Apply the extension gel in the shape of a medium stiletto shape
Step 5: Apply a layer of nail primer
Step 6: Add chip flake foil with the help of tweezers and randomly apply it on your nails
Step 7: Finish the design with the top coat
Step 8: Cure the gel
And there you go with the beautiful silver foil stiletto nail design!
Tips and Tricks for Using Cre8tion Extension Gel for Gel Nail Extension Design:
- Prep Nails Thoroughly: Clean nails properly before application to ensure better adhesion and longevity of the gel nail extension design.
- Apply Base Coat: Use a thin layer of base coat to provide a smooth surface for the extension gel and enhance its durability.
- Proper Curing: Ensure adequate curing time under the LED or UV lamp for each layer of gel to achieve maximum strength and prevent lifting.
- Shape Nails Carefully: Take your time to shape the nails precisely to your desired style using a nail file for a polished finish after curing the extension gel.
- Topcoat for Protection: Always finish the gel nail extension design with a scratch-resistant topcoat to seal and protect your nail design, ensuring it lasts longer without losing its shine.
Conclusion
Cre8tion Extension Gel stands out for its exceptional durability, flexibility, and ease of application, making it a top choice for nail enhancements and beautiful gel nail extension design. From classic to intricate designs, its versatility allows the scope for experimentation. Coupled with proper preparation and finishing, stunning nail designs are easily achievable with Cre8tion Extension Gel.
Get all you need to create these stunning nail designs at Treasure4 Nails now!